
How to Enable Developer Mode
February 16, 2024
This help article explains how to enable developer mode for Valheim, in order to be able to use console commands.
Opening the console while playing the game
Once you enter a Valheim world, to open the console window, press the F5 key on your keyboard, or if using a controller, press the LB + LT + Start button combination. Most console commands become eligible only after typing and executing devcommands command.
To see the list of other commands, you can visit out community Valheim Wiki page at: https://valheim.fandom.com/wiki/Console_Commands
What to do when the console doesn’t want to open
Check that the console is properly enabled. At the moment, the console mode is only enabled on Xbox consoles, and other platforms require different solutions for enabling the console. You can find out more about it further down in this guide.
Make sure that you are launching Valheim via proper shortcut through which you enabled the console (e.g. if you enabled the console via Steam, you also have to launch Valheim via Steam Library Shortcut).
When using keyboard, make sure that the keyboard is not active in Function mode. This is common on laptops and Mac devices, and deactivating this mode can depend on the device being used. You can test if your keyboard is sending F5 key input properly on this website: https://www.microsoft.com/applied-sciences/projects/anti-ghosting-demo
Depending on how you installed Windows and set up user permissions, you might need to launch Valheim in administrator mode to use the console.
How to enable the console on different platforms
Steam
In order to enable developer mode in Valheim, an argument: -console has to be added to launch options for Valheim in Steam library.
Go to Steam library → Right mouse click on Valheim → General . Then, under Launch options , add the -console argument to the list of launch options → Launch Valheim from Steam library

Microsoft Store
In order to enable developer mode in Valheim, an argument -console has to be added to target field for Valheim shortcut.
Go to Valheim installation directory (default is C:\XboxGames\Valheim\Content → Right mouse click on Valheim.exe → Create shortcut → Right mouse click on newly created Valheim.exe shortcut → Properties → Shortcut tab → Under Target field navigate to the end of existing text → Notice that the text ends with Valheim.exe → Add the end of Valheim.exe text, type one space character and then type -console → Click OK to confirm the changes and launch Valheim.exe Shortcut to launch Valheim with console enabled.
 For larger image visit: https://i.imgur.com/j2utJez.jpg
In some cases, due to how one installs Windows and sets user permissions, they might be some problems with file permissions. In that case the following method is advised:
Go to the Windows start icon at bottom left → type cmd → Open the Command prompt → Copy the following command: start shell:appsFolder\CoffeeStainStudios.Valheim_496a1srhmar9w!Game -console → Click anywhere in the console → Paste the command in the black console windows → Press Enter on the keyboard to execute the command and launch Valheim with console enabled.

Xbox
On Xbox, the console is enabled by default.
Mac App Store
Open Spotlight search by pressing ⌘ Command + Space key combination on your keyboard → A search bar should appear on your screen → In the search bar, type the word Terminal → Open the Terminal application by clicking on it or by pressing Return keyboard key → Copy the following line: /Applications/Valheim.app/Contents/MacOS/Valheim -console → Click with Right mouse button anywhere inside the Terminal application → Paste the line you copied → Press the Return keyboard key to launch Valheim with Console enabled.


You can also create a permanent icon that will launch Valheim with console enabled.
Open the Spotlight search by pressing ⌘ Command + Space key combination on your keyboard → A search bar should appear on your screen → In the search bar, type the word Automator → Open the Automator application by clicking on it or by pressing Return keyboard key → Cancel any pop-up windows you might get → In the upper left portion of the screen you should see Automator toolbar → Click on the File tab in the top left → New → Select Application when asked to choose a type for your document → Change the name of your Application by double clicking on the Untitled title on top of Automator popup → Change the title to Valheim with Console → Under Variables Search Bar type Run Shell Script and click on it twice when it appears below→ In the text box on the right, replace the default text (cat) with open -n -a "Valheim" --args –console → Click on the File tab in the top left → Save → Open the Spotlight search by pressing ⌘ Command + Space key combination on your keyboard → In the search bar, type Valheim with Console → You can drag and drop the Valheim with Console application to your Dock at the bottom, through which you can then launch Valheim with console enabled.
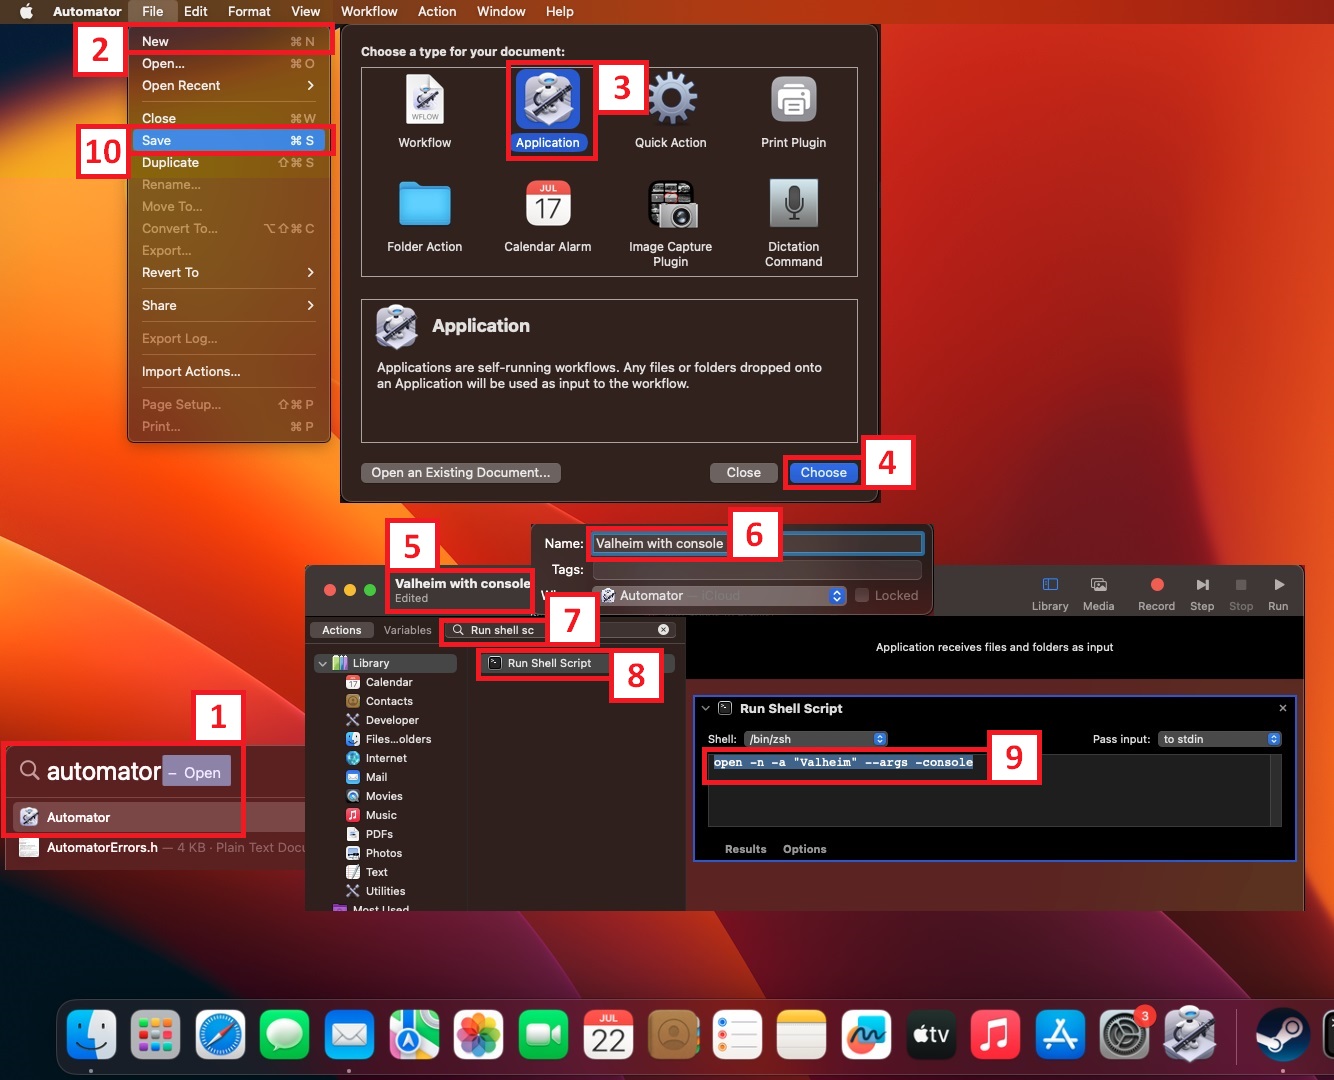
For larger image visit: https://i.imgur.com/Fpo6smw.jpeg